Translate

Monday, November 16, 2015

"You're What?" "Tin Roof, Rusted!"

 Firstly, this Onduvilla roof won't be rusting anytime soon.
 Jacob and Charlie got the out riggers all set up along the dormer. They used small angled 2x4's and some fascia boards to make the roof look like it extends further over along the hitch end of the house. The rain drip guard is nailed in place on the edge of the out riggers and Jacob has got it all prepped to be roofed. Carinna and Annie have a total of 3 coats of blue on the dutch door. 
Six out of our eight windows have been installed. Jacob and Annie installed the large side window, front window, and the two side dormer windows. Carinna and Jacob did the hitch end dormer window. Charlie and Jacob are working on the bathroom window, and the two narrow first story windows those are a bit trickier because they don't have nail fins. Hopefully by the next post we will have the roof completely finished and the hitch end dormers on!

Wednesday, November 4, 2015

Wrapped and Ready for Rain

 We got the house sealed up just in time for a week of rain!
 The window holes were cut and then the house was wrapped up! Charlie and Jacob put up roof paper and Tyvek covering the whole house. We ran out of Tyvek so some of the walls are covered in roof paper which will work in it's place as a vapor barrier. Annie taped all of the seams with Tyvek tape to make sure there would be no potential water exposure. Jacob put the fascia along the rafters and then attached the metal flashing and a rain drip guard to the roof. Today Jacob got some of the Onduvilla roofing material up and attached hopefully by the end of the week the first story roof will be totally covered. 
Annie and Marie window shopped for siding and bought the door knob and dead bolt for the front door at Lowe's. Carinna painted our front door a vibrant blue! It will need about two more coats of paint before it will be ready.

Sunday, October 25, 2015

House Sitting in Inclement Weather

 The sheathing is all put up!
I greatly appreciate Charlie taking pictures for me. I've been getting home in the dark lately. Carinna, Charlie, Jacob, and Marie all worked on cutting and putting up the sheathing. Today Charlie and Jacob cut the dormer window holes (more pictures to come). The little holes drilled in the sheathing, were used as guides for the saw when the window holes were cut.
 All of the bird/ventilation blocks were drilled and installed (shown right). Annie, and Jacob worked on caulking all the plywood seams. After the seams on the roof were caulked roof paper got put up which means that soon we'll be able to put on our roof! The walls will have tyvek put up and then the windows will be installed!
 

Sunday, October 11, 2015

Raise the Roof

 Sheathing is almost done!
The dormer rafters have all been cut but only some of them have been installed because we have to attach the security post under the dormer frame overhang. Most of the hurricane ties have been put up and Jacob spent several hours making 16 bird blocks and put up 4. The bird blocks discourage rodents and birds from living in our ceiling and also helps with ventilation.
All of the first story sheathing has been put on except for the front wall. The second story sheathing was put up (thank you James for helping) except for the rear wall. and the roof sheathing has been put up except for the loft and the dormer. There is still framing to be done in the storage loft and the roof sheathing needs to be finished.

Friday, October 2, 2015

Eve of the Pitched Rafters

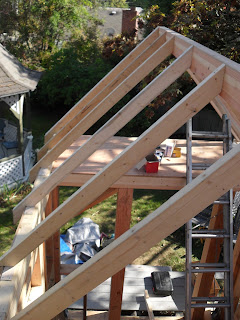
 Rafters! It's starting to have an actual house shape!
 Ben and Jacob got the rafters measured and cut, then Jacob and I made some corrections on the rafters last weekend.  The part connected to the wall needed some adjustments to account for the width of the plywood for it to fit over nice and snug. Carinna helped hand Jacob supplies while he was putting up the rafters, and now the ridge beam now stands without any additional support.
Hurricane ties will also be secured to the rafters to reinforce them. The sheathing for the loft has been measured and cut and will be attached this weekend.

I would also like to specially thank Larry, owner of GreenLake Painting for letting us pick through his warehouse for free paint! We got some nice yellow and blue paint.

Sunday, September 20, 2015

Stand up Tall, Tiny.

 It's getting taller!
 Jacob and Charlie spent the weekend getting the dormer frames up! The second story windows were measured and accounted for in the framing and the ridge beam was centered. Jacob will continue this week working on putting in the rafters and stabilizing the ridge beam. In regards to the first story he will also finish the sheathing,
As promised we have our dutch door on the left (needs knobs and paint) and our eight windows on the right! There's three for the loft, and five for the first story (one in bathroom, four in living area/kitchen).

Thursday, September 17, 2015

Tiny Tarp Blues

 Tiny blue tarp house!
We now have all the first story window's framed, the door framed, the storage loft and bed loft floor is done. The ridge beam is in position but is not perfectly centered or secured. The sheathing is put on the top half of the first story and Jacob is now working on framing the dormers. Our custom made dutch door is here it just needs knobs, and paint. Pictures of that will come but right now it's living in my computer room along with most of our windows. We ordered our roofing material from Home Depot the manufacturer is called Onduvilla it is composed of 50% recycled materials and natural pigments. The color I had hoped for is a sky blue color but the company no longer makes that so we're getting the terracotta color.

Monday, September 7, 2015

Laborious Labor Day

 Our tiny house now has framing on all walls, the bed loft, and storage loft!
Charlie and Jacob worked very hard this past three day weekend. They spent a long time crunching numbers making sure the plans are all measured right. They're so wonderful! I've requested the bathroom be against the back wall instead of the left side and I've also requested that the roof extend over the porch to provide a storage loft. After the plans were updated they cut and nailed in the loft framing and joists. They reinforced and extended the storage loft over the porch so that we'd have more headroom in the living area. The front wall got put up and we got our 6x6's put up and framed. Jacob found composite decking material that will get cut and screwed into place for our deck. It's grey right now but I'll paint it later.
  I bought more windows from Ballard Reuse and also from Second Use. They both gave us excellent deals. We got our door ordered from Frank Lumber, it's going to be a special cut dutch door the top half of the door will have glass panels and the bottom half will be plain wood. They're cutting, and framing the door to our specifications and they were really helpful with our weird size needs.
Special thanks to David and Bonnie for lending us their nail guns and air compressor hose.

Monday, August 31, 2015

And the Rain Rain Rain Came Down Down Down and Jacob Started Building

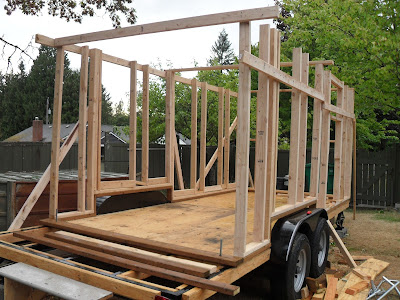
 Wall frames!
This was a wonderful surprise when I came home from work Saturday. The winds were really strong and mostly I'm just grateful that this little tin shed is the only thing that blew over. It landed inches away from the trailer wheels. There were power outages in the neighborhood and trees falling over but our little framed house prevailed!
This particular hole in the frame is for my kitchen window which can be seen in the Reused Kitchen Love'n post from earlier. I'm really looking forward to standing at my beautiful sink, and looking out the window of my tiny home. Tomorrow Jacob and I are headed to The Door Store to get our front door! Then we'll be headed back to Ballard Reuse to get the rest of our windows. Hopefully I'll comehome with a full truck.

Monday, August 24, 2015

Waylaid with a Wonderful Wedding

 One and one-third of the wall frame is up and standing at attention.
This has been a busy month for personal joy and not so much tiny house joy. Jacob quit his job so he could focus on getting a roof on our tiny house before winter, then we celebrated Jacob's 24th birthday! Following that excitement we adventured to Sequim Washington to celebrate the marriage of two wonderful people! Excuses, excuses I know. Jacob and I are also attempting a juice fast this coming week so hopefully come next week we'll be refreshed and ready to get these walls up!

Sunday, August 16, 2015

Reused Kitchen Love'n

 Today Charlie, Jacob, Marie, and I adventured to Ballard to the Ballard Reuse store!
 This incredibly beautiful little sink was waiting for us. I couldn't take my eyes off of it! It's 19-1/2" wide by 15-1/2" deep, perfect for our kitchen. Initially there were two different prices on it, so we snagged some help from upfront to clarify. Small talk ensued and we told her this lovely little sink will be the one and only sink in out entire tiny house! She thought it best to give it to us at the cheaper price but went to verify with the owner. The owner wanted to give us another $50 off! We got this adorable little Italian Sherle Wagner "Summer Garden" sink valued (on ebay) at about $500 for only $250!
We also found this lovely little window with duel operative panels and it's argon filled making it low-E. We paid $36 for this at Ballard Reuse. We had such a good experience at this store! They showed enthusiasm in our tiny project and asked for our blog address! We're definitely going to become regular customers.
 [You can click on the Ballard Reuse store name to be taken to their website]

Saturday, August 8, 2015

Stairway to Tiny

 Today Jacob worked on the rear wall frame!
 Following the plans, he measured and cut the king studs that make up the large box that is the wall frame. Then after nailing them into shape he made sure it was square and then added the vertical and horizontal interior studs. He's going to have to buy more 2x4's to make the side walls. After the side wall frames are made then he'll be able to nail them into the sill plate.
He also built some stairs to help us get on and off the trailer easier. These stairs may be for a tiny house but they're for a tall Jacob! Each step is a foot apart making this two step stair two feet tall. Marie (who is 5'6") is hoping that when the permanent stairs are built they'll be more accessible for the vertically challenged. For now Jacob (6'6") and I (5'9") can manage.

Monday, August 3, 2015

真倒霉 but, It Will All be Alright

 
 We had a minor setback with our tiny shack. The tongue and groove plywood on one side of the trailer wasn't cut properly and didn't line up with the metal frame; where the seam of the boards should be screwed in. So in less than a hour Charlie and I ripped up the sill plate and the plywood.
 After the problem plywood was evicted there was room for Jacob and Charlie to measure (quadruple check), cut, and use the self tapping screws to attach the plywood. After the tongue and groove was properly fitted then came the completed sill plate! Next step is getting supplies and starting to frame the walls.
Yet again a monkey wrench gets thrown in the works and we come out better than we started.

Tuesday, July 28, 2015

Updates were Lacking, Progress was Not

 This trailer is on it's way to being a home!
Jacob measured, cut, glued, and screwed some 2x4's into the porch. He realized that the fascia also needed to go in those sections where our porch goes. Better late than never! The sill sealer that we got was then taped onto the metal beams as a cushion between the plywood and the trailer frame.  He was then able to measure, cut, and drill the tongue and groove plywood. Shout out to neighbor John who helped Jacob maneuver the bigger plywood sections to fit snug around the welded metal rods. Charlie also helped with cutting and fitting the smaller sections in. Finally with everything fit on Jacob secured it all down with the self tapping screws.
Next to come: the pile of 2x4's on the trailer is going to be the sill plate which will be what we secure the walls to. Tomorrow Jacob will be measuring, and cutting the boards in preparation for their attachment! 

Saturday, July 11, 2015

Floored but Not Overwhelmed


Floor insulation has been started! Charlie, Jacob, and I spent the day working on the floor insulation.
We started our journey yesterday, Jacob ventured to Dunn Lumber to get the 2" and 1.5" Rmax foam insulation; and Home Depot to get the tongue and groove plywood, and the spray foam insulation. We forgot to get the sill sealer so returned to Home Depot this morning and when we arrived these windows were waiting! They were 25% off and looked perfect for our second story dormer widows.

The only bad news of the day really ended up being good news. The two boards of insulation together are 3.5" thick and the space that needs to be filled is 3", the foam is not forgiving and doesn't squish. The bad news is we need to get 1" foam boards to pair with the 2" boards. The good news is we can return several of the unused foam boards and in the long run I will actually end up saving $70ish. Hooray for good bad news! So we spent the day cutting the foam insulation and seeing what fits where and how many 1" boards we will need to buy. The next steps are to finish cutting the foam boards, fill all air pockets with spray foam insulation, line the exposed metal frame with sill sealer, cut the tongue and groove plywood, and finally screw the plywood into place. Hopefully, everyone cross your fingers, by next weekend we will have a solid floor foundation!

Wednesday, July 8, 2015

Jacob Stands Alone

Charlie, and I spent a short amount of time putting up Marie's shade tent to help keep the work area cool. It helps me to imagine it finished and with a roof too!  
Also, the fascia is attached! While I was at work today Jacob slaved over clamping and screwing this fascia onto our trailer. I included a close up picture to show the router work that Jacob did to fit the fascia snugly around the structure rods. He also used the chop saw to cut the 2X4 at an angle to fit around the wheel well. Praise Jacob for a first step well done!
  This is a close up on how the fascia is attached to the trailer, the self tapping screws are seated into the countersink holes that I had previously drilled. Next step is to buy insulation and plywood to insulate our flooring. More Progress and updates to come this weekend! 


Saturday, July 4, 2015

Fascia Mania!

 
 Starting out the day Jacob, Marie, and I worked on leveling the Gypsy Shack. First we had to get it off the blocks, and lowered down on the wheels and corner jacks. We decided it would be easier to level out the trailer if we kept one cinder block under each jack. After much finessing on Jacob's end the trailer was declared level! (for now)


Then came stage one of the fascia! We measured and cut all of the 2x4's to fit around the trailer frame. Then Jacob used the router to cut the slots in the 2x4's so they fit snugly around the welded bolts. I marked out 16" increments in the fascia pieces and drilled countersink holes in preparation for the final step of gluing the wood to the trailer, and then using the self taping screws to secure it in place. Hopefully by next weekend the fascia will be fully attached and we can move on to floor insulation!